In this article we are going to deal with a very common and necessary subject for many guitarists or professional luthiers who decide to repaint their guitar in nitrocellulose.
The most common will be that the guitar comes varnished in polyurethane or polyester. In our last article we explained in detail the difference between polyurethane and nitrocellulose varnished guitars, as well as how the type of varnish used on the guitar affects the sound. If you haven’t read it I recommend you to do it before starting this one.
Once we complete the tutorial below, the body of the guitar will be as good as new, ready to start varnishing.
What type of product does my guitar come varnished with?
To identify this you just need to know the origin, that is, where your guitar comes from.
Almost all guitars that come from industrial factories are varnished in polyester or polyurethane, except for the highest range models, which are usually varnished in nitro.
High-end guitars that are built by luthiers or craftsmen, which you should always ask them before or after you buy it, are also nitro varnished.
Why is it important to know the type of varnish your guitar is made in? These different types of finish are totally different and the process we will use to remove the varnish from the wood will depend on it.
How to remove the polyester or polyurethane varnish from the guitar?
This will be a laborious job, which requires a certain order and following the explained steps to do it correctly. If it is done as explained in the video, the process will be very simple and the wood of the guitar will be as good as new.
1 – Disassemble the guitar
For this we must start by cutting the strings, removing all the screws as well as the soundboard, in order to leave the body of the guitar isolated.
With this we will not damage any part of the guitar and we will not assemble the guitar until we finish the project, since we have a few steps ahead to follow.
For this step we will need an elementary tool during the process: the heat gun, I leave here the link of the one we use.
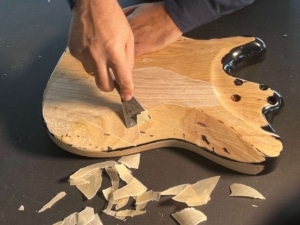
This heat gun is essential since heat is the only way to make the polyurethane come off the surface, since it is a very rigid product and difficult to remove. We will also need a spatula with a thin, sharp blade. The thicker it is the more difficult it will be to introduce under the layer of varnish.
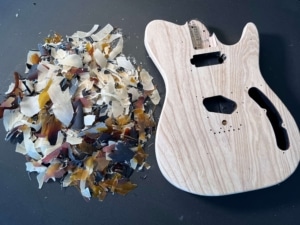
We start by applying heat to a specific area of the guitar for a couple of minutes. When we have heated that area sufficiently, we introduce the spatula trying to remove the first polyurethane sheet. Once this first one is removed, the rest will be easier to remove.
Recommendation: do not use excessive force and remove the first layer gently, so as not to damage the wood. In case during the process the wood is scratched with the spatula, it will not be a problem since this will be corrected by sanding, at the end of the whole process.
3 – Remove the primer coat
It is possible that during the previous step this layer has already been lifted in some parts. In case this has happened and it is easily removed, there would be no problem to do it simultaneously. However, if the undercoat does not come off together, we will wait to remove the entire finish and repeat the process with this last layer.
As can be seen in the attached video, both layers come off easily if we remove them just after applying heat to their area.
Recommendation: It is advisable not to do this whole process non-stop, as the inside of the guitar will get very hot, and we don’t want to risk damaging this. This process can be done in one day, but separated in 3 or 4 phases, to make sure that the guitar does not suffer any damage.
4 – Sand the guitar
To finish this process and leave the wood ready to start varnishing again, we must use 2 sandpapers of 240 and 400 grain
First we will sand with 240 sandpaper in order to eliminate the remains of varnish, as well as to level the wood if it has suffered any scratches during the process. Then we use a sandpaper of less roughness, 400, with the objective of leaving the body of the wood smoother and ready to begin the varnishing project as if this body had never been painted before.
Soon we will publish in our blog an article explaining how to close the pore of the wood with grain filler, and leave it ready to start the painting work